
 With some of my my leftover Boston Chai Party chai masala spice mix from making my Chai Ice Cream Cake, I attempted my first ever filled chocolates! I’m going to be honest, it did not go great. But they are pretty cute, and I’m definitely encouraged to try again. Read on to find out what went wrong…
The details:
Jump to recipe
Thought process:

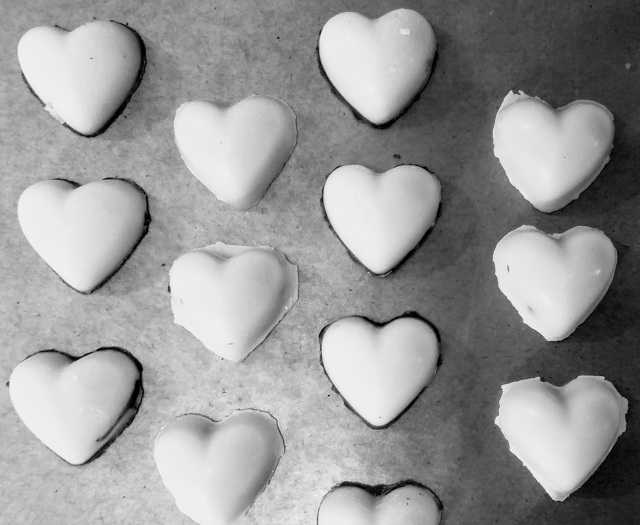
My friend recently gave me some silicone heart shaped candy molds and since I already broke the chai dessert dam, I just naturally flowed into making truffles with a chai filling. To mix it up, I added espresso to mimic a chai latte, which is definitely not authentic Indian but is a very common flavor combination at hipster coffee shops. So I guess this recipe is an example of my tenet CONFINE, in that I’m sticking with tried-and-true flavor combinations and only incorporate ingredients that will work chemically with a chocolate truffle.
For the ganache filling I relied on my favorite White Chocolate Fennel Truffles recipe from Sophia R on Food52 for the RATIOS of cream to chocolate and then reduced the amount of chai spice to maintain balance based on the chai/cream ratio I used in my ice cream cake recipe. Unfortunately, I made a huge error when I failed to re-read the white chocolate fennel truffles recipe closely enough. As a result, I added salt to the mix (salt and chocolate is a thing, right?) when it was actually supposed to be sprinkled on top of the final truffles. Oops! I also relied on Joy of Cooking for my instructions on tempering the chocolate and filling the molds. It was not that successful, but I’ve found this video that hopefully will make my second attempt much better. Other tips for next time are below:
Basic Ganache Recipe – Somewhere between 1:1 (1 oz chocolate to 1 oz cream) and 2:1 (2 oz chocolate to 1 oz cream) depending on the desired thickness. Pour hot cream over the chocolate and stir to melt. That’s it.

Double boilers – A double boiler is simply a stack of two containers. The one on the bottom touches the heat source and contains water that will boil. The container on the top is held by the bottom container but does not touch the heat source or the water – it only touches the steam produced during the boiling. My MacGyvered double boiler is two saucepans that are exactly the same size, but you could also use a metal or glass bowl over a smaller saucepan. The purpose of a double boiler is to precisely control the temperature of the top container in a way that a stovetop cannot. This works because water boils when it reaches 212°F. At that point, the water is converted to steam, which means that any remaining water in the pan is still only 212°F. It also means that the steam that is released from this boiling is also 212°F. Since this steam is the only source of heat for the top container, it is maintained at a constant (and relatively cool) 212°F for gentle and even heating. Using the physics of boiling water in this way is similar to using water baths when baking a cheesecake or making creme brulee.
Thermometers – In cooking and baking, there are some conditions where thermometers are unnecessary, and some where they are crucial. When cooking meat, thermometers help you determine the perfect point of doneness (not undercooked and a health hazard, not overcooked and tough) without having to cut into the meat. When making candy, thermometers are essential to ensuring that the physical changes that occur in the ingredients – caramelization of sugars, crystallization of cooling chocolate are controlled to produce the desired product. I have both an ethanol-based candy thermometer and an instant read digital thermometer. I only really use the candy thermometer when the material I’m measuring is quite liquid, so I can be sure that the heat in one area is representative of the whole batch. As you can see below, tempering chocolate requires constant monitoring of the temperature. While experts probably get a feel for what temperature the chocolate has reached without measuring, why take that risk?
Tempering Chocolate – Tempering is essential if you want your chocolate to be smooth, shiny, and have a nice snap when you bite into it. Tempering just means controlling the heating and cooling of the chocolate so that we coax the crystals of the chocolate to align in an order that produces that beautiful effect (for more detail on the physics of tempering, read this great Smithsonian Magazine article). Using a “seed” chunk of already tempered chocolate helps coax the melted chocolate into the right crystal formation. Most chocolate you buy in the store is already tempered, but you may have experienced opening up a candy bar and finding the chocolate to have white streaks and look chalky. This isn’t mold or dangerous in any way – it just means the chocolate has lost its temper and the cocoa butter has separated, probably because the chocolate melted a bit and then cooled improperly. To avoid this unpleasant look, temper any chocolate that is going to be unadulterated (just pure chocolate), such as in the shells of these truffles. The great thing about chocolate is that if you mess up and it loses it’s temper, you can just remelt the chocolate and temper it again! Below are basic instructions for tempering chocolate using the seeding method:
-
- Set up a double boiler over medium heat with about an inch of water in the bottom pan
- Add finely chopped chocolate and melt while stirring until it reaches 105-115°F (I used my instant read thermometer). This temperature should be reached shortly after all the chocolate is melted.
- Transfer the melted chocolate to a bowl and cool to 100°F while stirring
- Add a couple of reserved tempered chocolate chunks (the seed) and stir to cool until it reaches 86°F
- Remove the unmelted chocolate seeds to a piece of wax paper for hardening and later use
- The chocolate is now ready to use, although it may require additional heating or cooling to reach your desired consistency. As long as the chocolate remains between 85-90°F, it won’t lose its temper. Anything outside this range and you’ll want to start the process over!
Chai Latte Chocolate Truffles
- 8 oz white chocolate, 1 oz chunk reserved and the rest chopped fine
- 1/2 cup heavy cream
- 1 tsp chai spice
- 1/2 Tbsp espresso powder
1 tsp sea salt- 8 oz white chocolate, chopped fine and placed in a medium bowl
- Temper the 7 oz chopped chocolate

- Spoon the melted chocolate into the molds and use and offset spatula to spread to fill all the molds. At the same time, scrape the excess into a bowl so that there’s no chocolate on the edges of the molds.
- Tap the mold on the counter to release air bubbles that will mess up your shape
- Let the mold sit for 2 minutes to allow the chocolate to start hardening in the mold
 Invert the mold over a bowl and allow chocolate to drip out for 3-5 minutes. I did this by placing a cookie rack over the bowl and resting the mold upside down on the rack. I also tapped the mold against the rack every once in a while to make sure the chocolate was coming out. I also kept going back and using my offset spatula to make sure there was no chocolate on the edges of the mold. Basically, I did a lot of stuff because I was trying to keep my edges neat and the outer shell of the candies thin.
- If desired, repeat this process until you reach the desired thickness. I did not repeat, as I was more worried about being too thick than being too thin.
- Put the mold in the freezer for 30 min to firm up.
- While the shells are freezing, combine the cream, chai spice, and espresso powder in a small saucepan and heat over medium until espresso powder is dissolved and the mixture is hot but not boiling. (I added salt here because I thought it was in my source recipe but it wasn’t and it was a bad idea…)
- Pour the hot cream over the chopped chocolate in the bowl and stir until completely melted and everything is incorporated. Put this bowl in the fridge to cool down.
 When the shells are hard and the ganache is cool, transfer the ganache into a piping bag (see my tips and tricks about piping bags) and fill the shells. Do not fill the shells all the way or it will be difficult to seal the candies with the bottom layer of chocolate. I would recommend under-filling to over-filling.
- Leave molds on counter to settle while re-tempering the white chocolate left from step 6.
- Use an offset spatula to spread the tempered chocolate over the molds to seal the shells. Ideally, you will be able to smoothly spread on the bottom chocolate so that it seals the shells while scraping it off the edges so you’re left with a nice clean edge when you unmold your chocolates. This was the part I struggled with the most. I had originally put my molds back in the freezer to chill, but then when I spread on the bottom chocolate it immediately hardened and was wayyy to thick and messy (I should have seen that coming). Based on that, I actually had to buy more chocolate (I could only find dark at my 7-11) and try again with the molds completely at room temperature. That time went better, but the over-filled shells made it difficult to spread the chocolate evenly and get a good seal.
- Return the molds to the freezer or fridge to set a final time, then unmold.
Rating:
1/5 stars.
![]()

This was rough. It was my first time making molded chocolates, and I suffered from two major flaws. First, I put salt in the ganache when I wasn’t supposed to. That was pretty dumb and it made the chocolates way too salty and almost inedible. A lesson in paying attention, for sure! The second flaw was that I didn’t exactly know what I was doing with the technique of using a mold, but I am hopeful I will do much better next time after watching the above YouTube video. Stay tuned for my second attempt!

Pingback: Chai Latte Filled Chocolate Truffles #2 – Results Not Guaranteed
Mouthwatering yumminess!
LikeLike